How to Tie the Otaiko Musubi Obi Knot: Step-by-Step
The Art of the Obi: Beyond a Simple Sash
The kimono is globally recognized as a masterpiece of Japanese textile art, but the true structural and aesthetic anchor of the garment is the obi. While modern observers might view the obi merely as a decorative belt, its historical and functional significance is profound. According to the Victoria and Albert Museum's extensive research on Japanese dress, the obi evolved dramatically from a narrow, functional cord in the Kamakura period (1185–1333) into the wide, heavily brocaded sash seen in contemporary formal wear. Today, the obi dictates the formality, seasonality, and overall silhouette of the kimono ensemble.
For women, the most iconic, versatile, and widely recognized knot is the Otaiko Musubi (the "drum knot"). Characterized by its smooth, rounded, box-like shape at the lower back, the Otaiko Musubi is the gold standard for semi-formal and formal occasions, perfectly complementing garments like the tsukesage and homongi. In this comprehensive guide, we will walk you through the precise measurements, essential tools, and step-by-step techniques required to tie a flawless Otaiko Musubi using a Nagoya obi.
Understanding Obi Types and Formality
Before attempting the Otaiko Musubi, it is crucial to select the correct type of obi. The Metropolitan Museum of Art's Heilbrunn Timeline of Art History notes that the structural engineering of Japanese dress relies heavily on the specific dimensions and folding techniques of these sashes. Below is a comparison chart to help you choose the right obi for your outfit.
| Obi Type | Width / Dimensions | Formality Level | Recommended Knots |
|---|---|---|---|
| Maru / Fukuro | ~31 cm (Fully patterned) | Formal / Bridal | Niju-daiko (Double Drum), Bunko |
| Nagoya | ~31 cm (Pre-tapered) | Semi-Formal / Smart Casual | Otaiko Musubi (Single Drum) |
| Hanhaba | ~15 cm (Half-width) | Casual / Yukata | Bunko (Butterfly), Kai-no-kuchi |
Note: This tutorial specifically focuses on the Nagoya obi, which is pre-folded and stitched at one end to make the Otaiko Musubi more accessible for beginners and intermediate dressers.
Essential Tools for Kitsuke (Kimono Dressing)
Tying an obi securely without the use of pins, buckles, or adhesives requires a specific set of traditional accessories. Gather the following items before you begin:
- Koshi-himo (2-3 pieces): Long, soft cotton ties used to secure the kimono and obi in place during the wrapping process.
- Obi-ita: A stiff, flexible board inserted into the front of the obi to prevent wrinkling and maintain a smooth, flat surface across the stomach.
- Obi-makura: A small, firm pillow used to give the Otaiko "drum" its signature voluminous, rounded shape.
- Obiage: A decorative silk scarf that wraps around the obi-makura, hiding the internal structure while adding a pop of contrasting color.
- Obijime: A braided silk cord tied around the center of the obi to lock the entire structure together.
Step-by-Step Tutorial: Tying the Otaiko Musubi
Ensure your kimono is properly adjusted, with the hemline grazing the ankles and the collar forming a neat, fist-sized gap at the nape of the neck. You are now ready to tie the obi.
Step 1: Preparation and the First Wrap
Hold the Nagoba obi with the narrower, folded end (the tesaki or "tail") in your right hand, and the wider, open end (the tare or "drape") in your left. Leave about 40 to 50 centimeters of the tesaki extending past your right hip. Drape the obi around your back, bringing both ends to the front. Ensure the bottom edge of the obi sits exactly on your hip bones. Wrap the obi around your body a second time, pulling it taut to ensure the kimono beneath does not shift.
Step 2: Inserting the Obi-ita
Before completing the second wrap, slide the obi-ita board between the obi and the kimono at the front center of your waist. This board is vital for achieving the crisp, uncreased look expected in formal Japanese attire. Smooth the fabric over the board as you pull the obi tightly around your torso for the final time.
Step 3: Crossing and Securing the Base
At the front center, cross the wide tare end over the narrow tesaki end. Take a temporary koshi-himo (cotton tie) and wrap it tightly around your waist, directly over the crossed obi, tying it firmly at the front. This temporary tie holds the immense tension of the obi while you work on the back knot. Tuck the excess tesaki (tail) up and over the top edge of the obi, letting it hang down your back.
Step 4: Forming the Otaiko (The Drum)
Reach behind you and grasp the wide tare end. Pull it upward to your desired height—typically just below the shoulder blades for mature women, and slightly higher for younger women. Take your obi-makura (pillow) and place it inside the wide end of the tare. Wrap the fabric of the tare over the pillow, pulling it taut to create a smooth, rounded, drum-like bulge. The bottom edge of this "drum" should be perfectly horizontal.
Step 5: Locking the Shape
To secure the drum, take the attached strings of the obi-makura and tie them tightly at the front of your waist, just below the main obi line. Next, take the narrow tesaki (tail) that you tucked up earlier, pull it down over the center of the drum you just created, and tuck it securely into the top edge of the obi wrapped around your waist. This anchors the pillow and creates the "bridge" of the drum knot.
Step 6: Tying the Obiage (The Scarf)
Drape the obiage scarf over the top of the obi-makura pillow at the back, ensuring it covers the structural elements completely. Bring the two ends of the scarf to the front. Tie a simple, flat square knot at the center front, then tuck the excess fabric neatly into the top edge of the obi. The obiage should peek out just slightly (about 1 to 2 centimeters) above the obi, adding a refined layer of color.
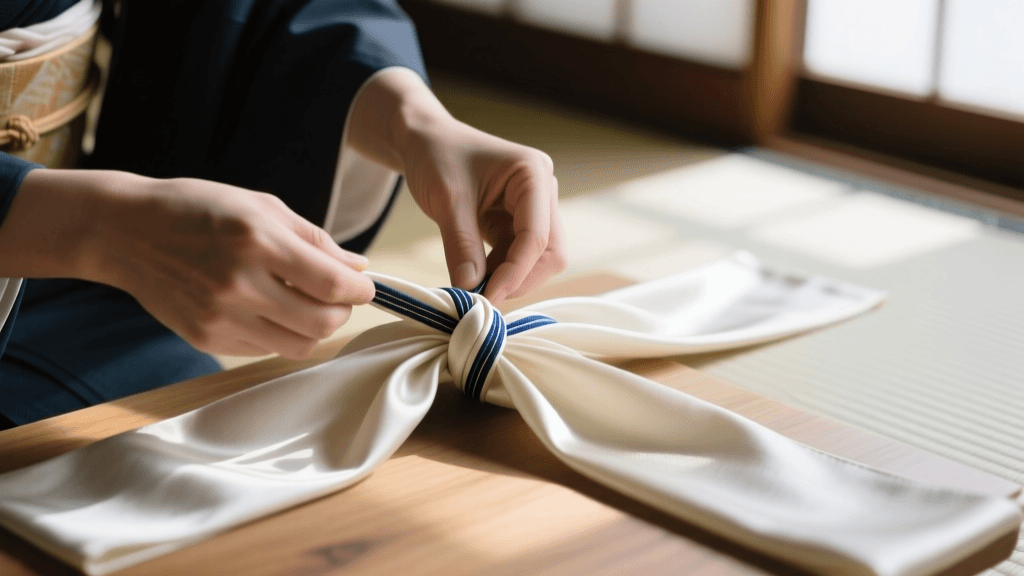
Step 7: Fastening the Obijime (The Cord)
Finally, take the obijime cord and wrap it around the exact vertical center of the obi, passing it over the tucked tail at the back. Bring the ends to the front and tie a secure, decorative knot (such as a standard flat knot or a specialized braided knot). Tuck the fringed ends of the cord neatly under the wrapped layers. Remove the temporary koshi-himo from the front, and adjust the front panels of the obi for perfect symmetry.
Troubleshooting Common Obi Issues
- The Drum is Sagging: This occurs when the obi-makura is not tied tightly enough at the front, or the tare fabric was not pulled taut over the pillow. Always pull the fabric downward firmly before tying the pillow strings.
- Wrinkles in the Front: If the front of your obi looks crumpled, your obi-ita board may be too narrow, or you failed to smooth the fabric laterally while wrapping. Always use a wide, rigid board for formal Fukuro or Nagoya obis.
- Asymmetrical Collar: The tension of the obi wrapping often pulls the kimono collar out of alignment. After tying the temporary koshi-himo, always re-adjust the front collar and secure it with a small clip or an additional tie before finishing the back knot.
Experiencing the Kimono in Modern Japan
While mastering the Otaiko Musubi at home is a rewarding endeavor, experiencing it in its native cultural context is unparalleled. The Japan National Tourism Organization (JNTO) heavily promotes kimono rental experiences in historic districts like Kyoto's Higashiyama or Kanazawa's tea houses, where professional kitsuke (dressers) can demonstrate these intricate tying techniques in person. Observing a professional dresser apply the precise tension and geometric folding required for the Otaiko Musubi provides invaluable insight that written tutorials alone cannot convey.
Whether you are practicing in your living room or preparing for a traditional tea ceremony in Kyoto, understanding the mechanics of the obi transforms the kimono from a mere costume into a profound engagement with Japanese heritage. Take your time, respect the tension of the silk, and enjoy the architectural beauty of the Otaiko Musubi.