Master the Bunko Musubi: Step-by-Step Obi Knot Tutorial
The Art of the Obi: Introduction to the Bunko Musubi
The kimono is universally recognized as a masterpiece of Japanese textile art, but it is the obi—the wide sash that secures the garment—that truly serves as the focal point of the ensemble. Historically, the obi evolved from a narrow, functional cord into a wide, elaborate canvas for weavers and dyers. As noted by the Victoria and Albert Museum, the obi transformed from a simple tie in the 16th century to an extravagant, highly structured garment component by the Edo period, dictating the wearer's formality, age, and marital status.
For beginners, tourists participating in kimono rentals, and casual wearers, the Bunko Musubi (library knot or bow knot) is the most essential knot to master. Resembling a classic butterfly or gift bow, the Bunko Musubi is primarily worn by unmarried women and is the standard knot for the lightweight, casual summer yukata. According to the Japan Guide, the yukata and its accompanying obi knot are staples of summer festivals, fireworks displays, and casual outings in Japan. This tutorial will guide you through the exact measurements, tools, and steps required to tie a flawless Bunko Musubi.
Essential Tools and Measurements
Before you begin tying, you must gather the correct accessories. Kitsuke (the art of kimono dressing) relies heavily on specific undergarments and ties to maintain the garment's cylindrical silhouette and prevent the obi from slipping.
- Hanhaba Obi (Half-Width Obi): The standard obi for the Bunko Musubi. It measures approximately 15 to 17 cm in width and 360 cm (about 4 yards) in length.
- Koshihimo (Waist Ties): You will need at least two long, thin cotton or silk ties to secure the kimono and the obi in place.
- Datejime (Under-Sash): A wide, elastic or woven belt worn over the koshihimo to smooth out wrinkles and provide a firm base for the obi.
- Obi-ita (Obi Board): A stiff, felt-covered board inserted into the front of the obi to prevent creasing and maintain a flat, elegant appearance.
- Obijime (Optional): A decorative braided cord. While not strictly necessary for a casual Hanhaba obi, it can be added for a pop of color and extra security.
Comparison of Popular Obi Knots
Understanding where the Bunko Musubi fits into the broader spectrum of Japanese fashion is crucial for dressing appropriately. Below is a comparison chart of common obi knots, their required obi types, and their formality levels.
| Knot Name | Best Obi Type | Formality Level | Difficulty | Typical Wearer |
|---|---|---|---|---|
| Bunko Musubi | Hanhaba (Half-width) | Casual / Summer | Beginner | Unmarried women, yukata wearers |
| Taiko Musubi | Fukuro / Nagoya | Semi-Formal to Formal | Intermediate | Married women, older women |
| Fukura Suzume | Hanhaba / Fukuro | Casual to Semi-Formal | Advanced | Young women, coming-of-age |
| Kawari Musubi | Hanhaba | Casual / Fashion | Advanced | Children, teens, modern fashion |
Step-by-Step Tutorial: Tying the Bunko Musubi
Tying an obi requires patience and precision. For the best results, dress in front of a full-length mirror. If you are a beginner, it is highly recommended to practice the knot on a chair back or a specialized kimono hanger before attempting it on your body.
Phase 1: Preparation and Wrapping
Step 1: Measure the Te-saki (The Short End)
Hold the obi horizontally behind your back. Grasp the left end (the te-saki). For a standard Bunko Musubi, measure out approximately 40 to 50 cm (about the length of your forearm). This short end will form the center of your bow. Pinch this point firmly with your left hand.
Step 2: Wrap the Tare-saki (The Long End)
Bring the long end (tare-saki) around your waist from right to left, ensuring the bottom edge of the obi aligns perfectly with your datejime. Keep the fabric taut. Wrap it around your waist a second time. The bottom edge of the second wrap should slightly overlap the first wrap, creating a subtle upward angle (about 2 cm higher at the back than the front) to ensure a flattering fit.
Step 3: The Initial Cross
Bring both ends to your front. Cross the long end over the short end, then pull the long end up and through the loop from the bottom, creating a basic, tight square knot right at your center front. Pull both ends tightly to secure the obi to your waist.
Phase 2: Creating the Bow Wings
Step 4: Form the Pleats
Take the long end (tare-saki) and fold it into an accordion pleat to create the 'wings' of the bow. For a standard look, create three distinct pleats, each about 15 cm wide. The total width of your pleated section should match your shoulder width. Pinch the exact center of these pleats tightly.
Step 5: Shape the Short End
Take the short end (te-saki) and fold it in half vertically to create a smaller, secondary set of wings. Place this folded short end horizontally across the center of the pleated long end you are holding in your other hand. You should now have a shape resembling a butterfly.
Phase 3: Securing and Adjusting
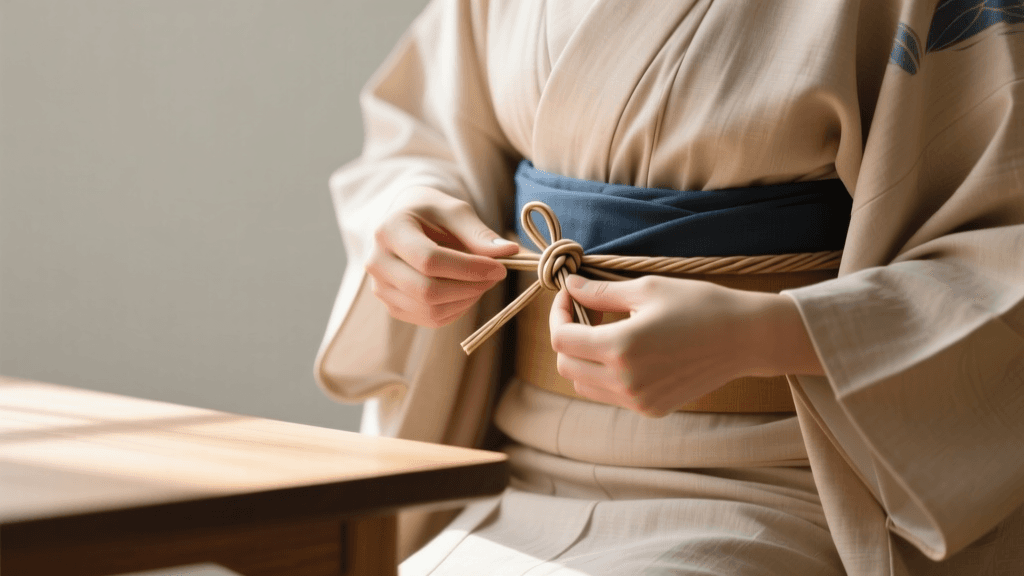
Step 6: Bind the Center
Take the remaining length of the long end and wrap it tightly around the center pinch point of your bow multiple times. This acts as the 'knot' of the gift bow. Tuck the very tip of the fabric into the wraps to hide it.
Step 7: Insert the Obi-ita and Rotate
Before moving the knot to the back, slip the obi-ita board between the obi and the kimono at the front to smooth the fabric. Now, grasp the entire obi (both the front wrap and the bow) and rotate it clockwise around your body until the bow sits perfectly centered on your back. Pro Tip: Always rotate the obi clockwise; counter-clockwise rotation is associated with dressing the deceased in Japanese funerary traditions.
Step 8: Final Adjustments
Fluff the wings of the bow to ensure they are symmetrical. Adjust the angle of the bow so it sits slightly upward, giving a youthful, energetic appearance.
Seasonal Variations and Styling
The beauty of the Hanhaba obi lies in its versatility. While the basic Bunko Musubi remains the same, the fabric choices and styling adapt to the seasons. The Japan National Tourism Organization highlights that experiencing traditional dress is deeply tied to Japan's micro-seasons.
- Spring: Opt for pastel-colored obi featuring cherry blossoms (sakura) or plum blossoms. Pair with a light pink or mint green yukata.
- Summer: Choose sheer, woven obi (ro or sha) or cool-toned cottons with motifs like morning glories, fans, or flowing water. This is the peak season for the Bunko Musubi at fireworks festivals.
- Autumn: Transition to richer hues like burnt orange, deep crimson, or mustard yellow, featuring motifs of maple leaves, chrysanthemums, or autumn grasses.
- Winter: While yukata are less common in winter, if wearing a casual wool or polyester kimono, choose a thick, warm Hanhaba obi with snow crystals, pine trees, or camellia motifs.
'The obi is not merely a belt; it is the structural anchor of the kimono and the emotional expression of the wearer. A well-tied Bunko Musubi should look effortless, yet it requires a deep understanding of tension and geometry.' — Traditional Kitsuke Instructor Proverb
Troubleshooting Common Mistakes
Even experienced dressers encounter issues. Here is how to fix the most common Bunko Musubi problems:
- The Bow is Drooping: This happens when the center bind is too loose, or the tare-saki was not pulled tightly enough during the initial front knot. Fix: Use a small obijime cord to tie tightly around the center of the bow at the back, or insert a small towel roll behind the bow to prop it up.
- The Obi is Digging into the Ribs: You have wrapped the obi too tightly. The obi should sit firmly on the hip bones and lower ribs, but should allow you to breathe comfortably. Fix: Loosen the initial wrap and ensure the tension is distributed evenly across the back rather than cinched at the front.
- Uneven Wings: The pleats were not measured correctly. Fix: Use your hand span (from thumb to pinky) as a consistent measuring tool for each pleat to guarantee symmetry.
Cultural Etiquette and Final Thoughts
Wearing a kimono and tying an obi is an immersive cultural experience that commands respect. When wearing a Bunko Musubi with a yukata, remember that this is strictly casual wear. It is appropriate for summer festivals, casual strolls through historic districts like Kyoto's Higashiyama, or relaxing at a ryokan (traditional inn). It is not appropriate for formal ceremonies, tea ceremonies, or visiting shrines during solemn religious events.
Mastering the Bunko Musubi opens the door to the wider world of Japanese traditional garments. With practice, the muscle memory will take over, allowing you to tie a beautiful, secure bow in under five minutes. Whether you are preparing for a trip to Japan, attending an anime convention, or simply celebrating Asian textile traditions at home, the Bunko Musubi remains a timeless, elegant, and deeply rewarding skill to acquire.