Mastering the Taiko Musubi: Step-by-Step Obi Tying Guide
The Art and Architecture of the Obi
The obi is far more than a simple belt; it is the structural and aesthetic anchor of traditional Japanese clothing. In the practice of kitsuke (the art of kimono dressing), the obi dictates the formality, silhouette, and overall elegance of the ensemble. According to the Victoria and Albert Museum, the obi evolved from a simple functional cord in the Heian period into a massive, elaborate textile masterpiece by the Edo period, serving as a canvas for intricate weaving, dyeing, and embroidery techniques.
Among the myriad of ways to tie this magnificent sash, the Taiko Musubi (drum knot) remains the most iconic, versatile, and widely recognized knot for adult women. Characterized by its smooth, rounded back that resembles a traditional Japanese drum, the Taiko Musubi is appropriate for almost all formal and semi-formal occasions. This comprehensive guide will walk you through the precise measurements, essential tools, and step-by-step techniques required to master this timeless knot.
Essential Tools for Kitsuke (Kimono Dressing)
Before attempting to tie an obi, you must gather the proper accessories. The modern Taiko Musubi relies on several hidden supports to maintain its architectural shape throughout the day. Below is a structured list of the essential tools, their Japanese names, and standard measurements.
| English Name | Japanese Name | Purpose | Standard Measurements & Material |
|---|---|---|---|
| Obi Board | Obi-ita | Prevents wrinkling at the front of the waist | 15cm x 40cm (Plastic with felt covering) |
| Obi Pillow | Obi-makura | Creates the structural volume of the drum | 20cm x 10cm (Cotton/Polyester blend) |
| Decorative Cord | Obi-jime | Secures the knot and adds a color accent | 150cm long (Braided silk or rayon) |
| Obi Scarf | Obi-age | Hides the obi pillow and adds a layered look | 30cm x 130cm (Silk crepe or chirimen) |
| Tying Cords | Koshi-himo | Temporary securing during the dressing process | 110cm long (Cotton muslin or silk) |
Understanding Your Obi: Nagoya vs. Fukuro
The Taiko Musubi can be tied using two primary types of obi: the Nagoya obi and the Fukuro obi. The Nagoya obi is pre-folded and stitched at the narrow end (the te-saki), making it significantly easier for beginners to tie. It typically measures about 315cm in length and 30cm in width. The Fukuro obi is a fully woven, double-width sash measuring roughly 420cm long and 30cm wide, reserved for highly formal events. For this tutorial, we will focus on the Nagaya obi, as it is the standard choice for everyday elegance, tea ceremonies, and cultural outings.
Step-by-Step Tutorial: Tying the Taiko Musubi
Step 1: Preparing the Te-saki (The Narrow End)
Begin by draping the obi over your right shoulder. The narrow end, known as the te-saki, should hang down your back to about the length of your arm (roughly 45cm to 50cm). The wider end, the tare-saki, will drape over your front. Fold the te-saki in half lengthwise to create a clean edge, and secure it temporarily with a clip or by holding it firmly with your left hand.
Step 2: Wrapping the Obi Around the Waist
Take the wide tare-saki and wrap it around your waist from right to left. Ensure the obi sits at the correct height: slightly lower in the front and slightly higher in the back. Wrap the obi around your waist a second time, pulling it taut to ensure a secure fit. Insert your obi-ita (obi board) between the layers of the obi at the front center to keep the fabric perfectly smooth and wrinkle-free. Cross the two ends at your back, bringing the wide end over the narrow end.
Step 3: Forming the Otaiko (The Drum)
This is the most critical structural step. Take the wide tare-saki and fold it upward to create the desired width of the drum (usually about 30cm). Place your obi-makura (pillow) inside this fold. Pull the pillow tight against your lower back and tie the strings of the pillow securely at the front of your waist, right above the obi. Adjust the fabric so the pattern is centered and the bottom edge of the drum forms a clean, straight horizontal line.
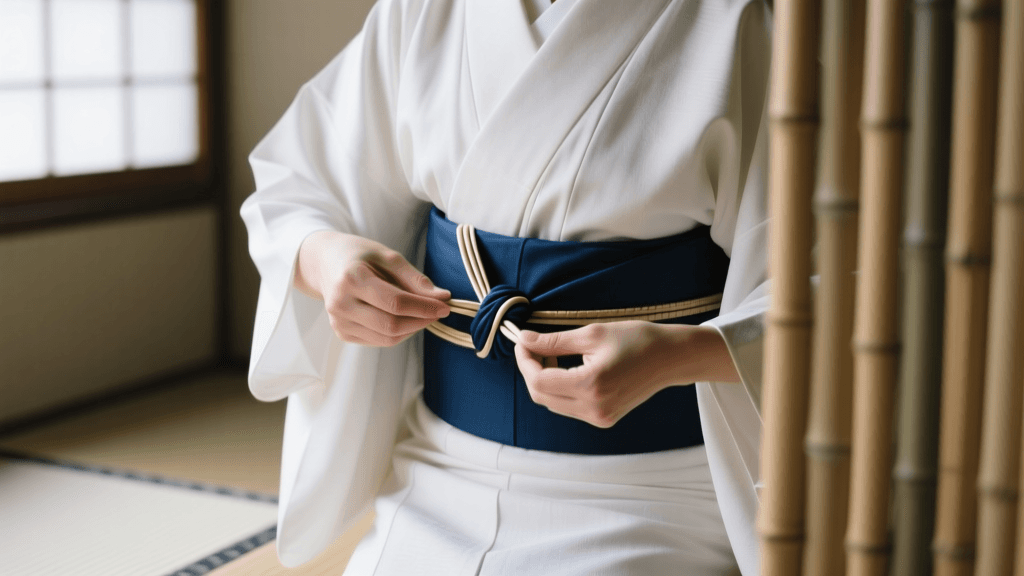
Step 4: Securing with Obi-jime and Obi-age
Take the narrow te-saki that has been hanging down and fold it upward, tucking it neatly inside the bottom fold of the drum. Next, take your obi-age (scarf), wrap it around the obi pillow to conceal it completely, and tie a temporary knot at the front. Finally, thread your obi-jime (cord) through the exact center of the drum, wrap it around your waist, and tie a secure, flat square knot at the front center. Tuck the excess obi-age into the top of the obi, leaving just a sliver of color visible.
Cultural Etiquette and Temple Visits
When wearing a kimono and obi in Japan, particularly in historic cities like Kyoto, cultural etiquette is paramount. The Kyoto City Tourism Association frequently advises international visitors on the proper protocols for temple visits and traditional district walking. Always ensure your kimono is wrapped left over right; wrapping right over left is strictly reserved for dressing the deceased for funerals. Furthermore, when visiting shrines or traditional tea houses, the subdued elegance of the Taiko Musubi shows respect for the tranquil environment, whereas overly flashy bows might be considered inappropriate for sacred spaces.
Comparison: Taiko Musubi vs. Bunko Musubi
While the Taiko Musubi is the standard for adult women, the Bunko Musubi (bow knot) is another popular choice. Below is a comparison to help you decide which knot suits your occasion.
| Feature | Taiko Musubi (Drum Knot) | Bunko Musubi (Bow Knot) |
|---|---|---|
| Target Demographic | Adult women (20s and older) | Young girls, children, and yukata wearers |
| Formality Level | Semi-formal to Formal | Casual to Semi-formal |
| Best Garment Type | Silk Kimono, Homongi, Tsukesage | Cotton Yukata, Furisode (with variations) |
| Visual Silhouette | Smooth, rounded, architectural | Playful, winged, butterfly-like |
Expert Troubleshooting Tips
Pro Tip: If your Taiko drum is sagging at the back, your obi-makura (pillow) is likely tied too low, or the obi-jime (cord) is not pulled tightly enough through the center. Always pull the koshi-himo (tying cords) with significant force during the wrapping stage; the obi should feel snug, almost like a supportive corset, to bear the weight of the knot.
Another common mistake is allowing the obi-age to show too prominently. For formal kimono, the obi-age should only peek out by about 5 millimeters above the obi. For a more relaxed, modern look, you can show up to 2 centimeters. The Japan National Tourism Organization notes that many modern kimono rental shops now offer pre-tied obi accessories that mimic the Taiko Musubi, allowing tourists to slip them on like a belt. However, learning to tie it from scratch offers a deeply rewarding connection to Japanese textile heritage.
Conclusion
Mastering the Taiko Musubi is a journey of patience, precision, and appreciation for traditional Japanese aesthetics. By understanding the purpose of each hidden tool and practicing the geometric folds of the Otaiko drum, you can achieve a flawless, culturally respectful silhouette. Whether you are attending a formal tea ceremony, participating in a summer festival, or simply exploring the historic streets of Higashiyama, a properly tied obi will ensure you carry the elegance of Asian traditions with confidence and grace.