How to Tie an Otaiko Musubi Obi Knot: Step-by-Step Guide
Introduction to the Otaiko Musubi (Drum Knot)
The Otaiko Musubi (太鼓結び), translating to "drum knot," is the most iconic and widely worn obi knot for women's semi-formal and formal kimono in Japan. Characterized by its smooth, rounded, and box-like shape at the back, it resembles the body of a traditional Japanese drum. Unlike the elaborate, floral knots worn by maiko (apprentice geisha) or the simple bows of a casual yukata, the Otaiko Musubi projects an aura of refined maturity, elegance, and understated grace. It is the standard knot for married women attending weddings, tea ceremonies, and formal gatherings.
According to the Victoria and Albert Museum's comprehensive guide on the Kimono, the evolution of the obi from a thin, functional sash in the early Edo period to a wide, elaborate centerpiece necessitated complex tying techniques. The Otaiko knot, specifically, gained immense popularity in the late 19th and early 20th centuries as kimono silhouettes became more structured and standardized.
Choosing the Right Obi: Nagoya vs. Fukuro
Before beginning your tutorial, it is crucial to select the correct type of obi. While the Otaiko shape can be achieved with various belts, two types are predominantly used:
- Nagoya Obi: Invented in the 1920s by a seamstress in Nagoya, this obi is approximately 315 cm long. One edge is pre-folded and stitched to about 15 cm in width, while the other remains the full 30 cm width. This clever design makes tying the single-layer Otaiko (Ichiju-Daiko) significantly easier and is the standard choice for semi-formal occasions.
- Fukuro Obi: Measuring around 420 cm in length and fully wide (approx. 30 cm), the Fukuro obi is highly formal, often woven with gold or silver threads. Tying an Otaiko with a Fukuro obi requires creating a double-layered drum (Niju-Daiko), which is reserved for weddings and highly formal events.
Note: This step-by-step tutorial focuses on the Nagoya Obi, as it is the most practical and common choice for modern kimono wearers and tourists engaging in cultural experiences.
Essential Tools and Measurements
Tying a flawless Otaiko Musubi requires more than just the obi itself. Traditional kimono dressing (kitsuke) relies on a specific array of accessories to provide structure, maintain tension, and add decorative layers. As noted by Encyclopedia Britannica's entry on the Kimono, the modern kimono silhouette is heavily dependent on these hidden and visible structural aids.
| Tool Name | Japanese Term | Standard Dimensions | Primary Purpose |
|---|---|---|---|
| Obi Pillow | Obi-makura | 15cm x 5cm | Provides the structural volume and rounded shape for the drum. |
| Front Board | Obi-ita | 45cm x 15cm | Inserted between obi wraps to keep the front smooth and prevent creasing. |
| Decorative Cord | Obi-jime | 150cm length | Secures the knot tightly while adding a contrasting pop of color. |
| Silk Scarf/Sash | Obi-age | 120cm x 30cm | Covers the obi-makura pillow and adds a layered, elegant accent at the top. |
| Tie Cords | Koshi-himo | 90cm length (x2) | Temporary cotton or silk cords used to hold the obi in place while tying. |
Step-by-Step Tutorial: Tying the Otaiko Musubi
Step 1: Preparing the Obi and Tesaki
Drape the Nagoya obi over your left shoulder with the patterned side facing outward. The narrow, pre-folded part should be at the top. Measure the Tesaki (the short end). For a standard Otaiko, the Tesaki should measure approximately 40 to 50 cm, or roughly the width of your back. Temporarily secure this short end to your collar using a small clip or a rubber band to keep it out of your way while you wrap the body.
Step 2: Wrapping the Body
Take the long end (Tare) and wrap it around your waist from left to right, ensuring the bottom edge aligns perfectly with your hips. Keep the tension firm. Wrap it around a second time. Before completing the second wrap, slide the Obi-ita (front board) between the first and second layers at the front of your waist to ensure a smooth, crease-free finish. Secure the two layers tightly at the center front with a koshi-himo (tie cord).
Step 3: Crossing at the Back
Bring both the Tesaki (short end) and the Tare (long end) to the center of your back. Cross the Tare over the Tesaki, creating an "X" shape. The Tare should be on top, pointing upward, while the Tesaki points downward. Hold this intersection firmly, as the structural integrity of the entire knot relies on this cross. Secure the intersection temporarily with another koshi-himo tied tightly around your waist.
Step 4: Inserting the Obi-Makura (Pillow)
Take your Obi-makura and place it horizontally against your back, resting it on top of the upward-pointing Tare. Wrap the Tare fabric over the pillow, pulling it downward tightly to create the rounded "drum" shape. Tie the strings of the obi-makura securely at the front of your waist, just above the main obi wrap. The tension here is critical; a loose pillow will result in a sagging, unflattering knot.
Step 5: Forming the Otaiko (Drum) Shape
Fold the remaining length of the Tare upward and inward to create the flat bottom of the drum. The folded edge should sit neatly just below the Tesaki. The width of this folded section should match the width of your back. Use a specialized clip (called an obi-clip or a simple binder clip) to hold this bottom fold in place against the back of the obi while you prepare the final securing cords.
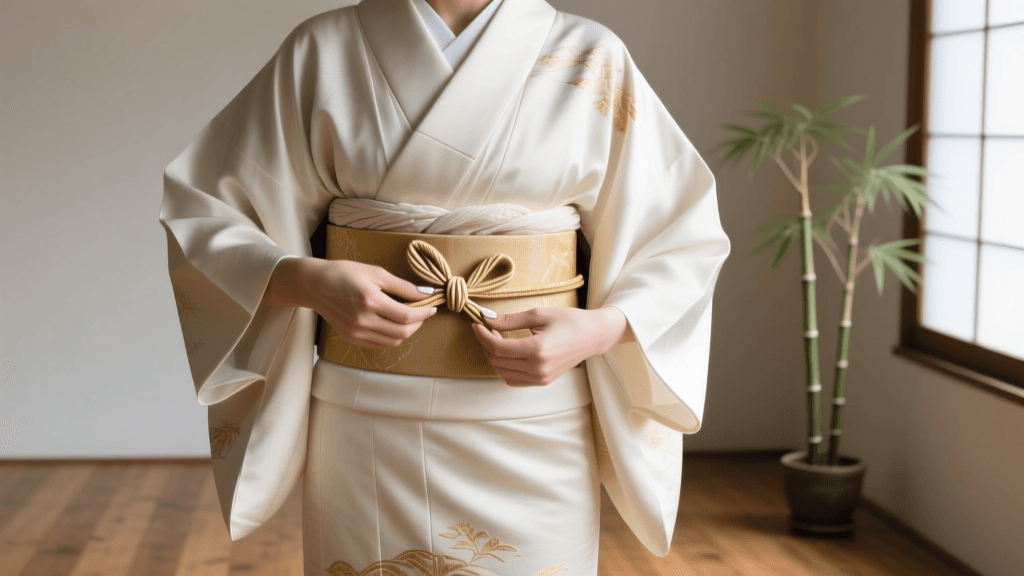
Step 6: Securing with Obi-jime and Obi-age
Thread the Obi-jime (decorative cord) through the center of the drum shape, between the Tesaki and the folded Tare. Bring it to the front, cross it, and tie a secure, flat knot (usually a simple square knot or a specialized decorative knot). Tuck the excess cord ends neatly into the sides of the obi.
Finally, take the Obi-age (silk scarf). Wrap it around the top of the obi-makura at the back, tucking the ends into the top of the obi at the front. Only a sliver (about 1-2 cm) of the Obi-age should be visible at the front, adding a subtle hint of color and luxury.
Common Mistakes and Pro Tips
- Sagging Drum: This is almost always caused by insufficient tension when wrapping the Tare over the obi-makura in Step 4. Always pull downward with your full body weight before tying the pillow strings.
- Uneven Front: If the front of your obi looks wrinkled, your Obi-ita (front board) may be placed incorrectly, or your initial wraps were not pulled taut enough. Always use a mirror to check the front profile before moving to the back.
- The Tesaki Slip: The short end (Tesaki) can sometimes slip out from behind the drum. Ensure it is pulled taut and tucked securely behind the Obi-jime cord at the back.
Cultural Context and Modern Styling
Understanding the cultural weight of the Otaiko Musubi enhances the experience of wearing it. As highlighted by the Japan Experience cultural guides, the kimono is not merely clothing but a reflection of social harmony, respect for the occasion, and seasonal awareness. The Otaiko knot, with its modest and contained silhouette, perfectly embodies the Japanese aesthetic concept of shibui—simple, subtle, and unobtrusive beauty.
For modern tourists participating in kimono rental experiences in Kyoto or Tokyo, the Otaiko Musubi is frequently adapted. Rental studios often use pre-tied obi belts that hook into the back of the kimono for convenience, mimicking the exact dimensions of a hand-tied Otaiko. However, for those studying traditional kitsuke or attending formal events, mastering the hand-tied Otaiko Musubi remains a rite of passage and a deeply rewarding connection to Japanese sartorial heritage.
Whether you are dressing for a traditional tea ceremony in Uji, attending a friend's wedding in Tokyo, or simply practicing the meditative art of kitsuke at home, the Otaiko Musubi stands as a timeless testament to the engineering and artistry of Japanese fashion.