Master the Otaiko Knot: Step-by-Step Nagoya Obi Tutorial
Introduction to the Otaiko Knot and Nagoya Obi
The kimono is globally recognized as a masterpiece of Japanese textile art, but the true structural marvel of traditional Japanese dress lies in the obi. The obi is not merely a belt; it is a complex, sculptural element that defines the silhouette, formality, and aesthetic of the entire outfit. Among the myriad of knot styles, the Otaiko (drum) knot remains the most iconic, versatile, and widely worn knot for adult women. Characterized by its smooth, rounded rectangular shape at the back, the Otaiko knot exudes elegance and maturity, making it appropriate for everything from tea ceremonies to formal dinners.
While the elaborate Fukuro obi is often used for highly formal occasions, the Nagoya obi is the undisputed champion of everyday elegance and semi-formal wear. Invented in the 1920s by a seamstress in Nagoya, this obi style was designed to be easier to tie than the traditional Maru or Fukuro obi, without sacrificing beauty. According to the Metropolitan Museum of Art, the evolution of the obi reflects broader shifts in Japanese society, moving from the heavily layered, restrictive garments of the Edo period to the more practical, streamlined silhouettes of the modern era. This tutorial will guide you through the precise art of tying an Otaiko knot using a standard Nagoya obi.
Understanding the Anatomy of the Nagoya Obi
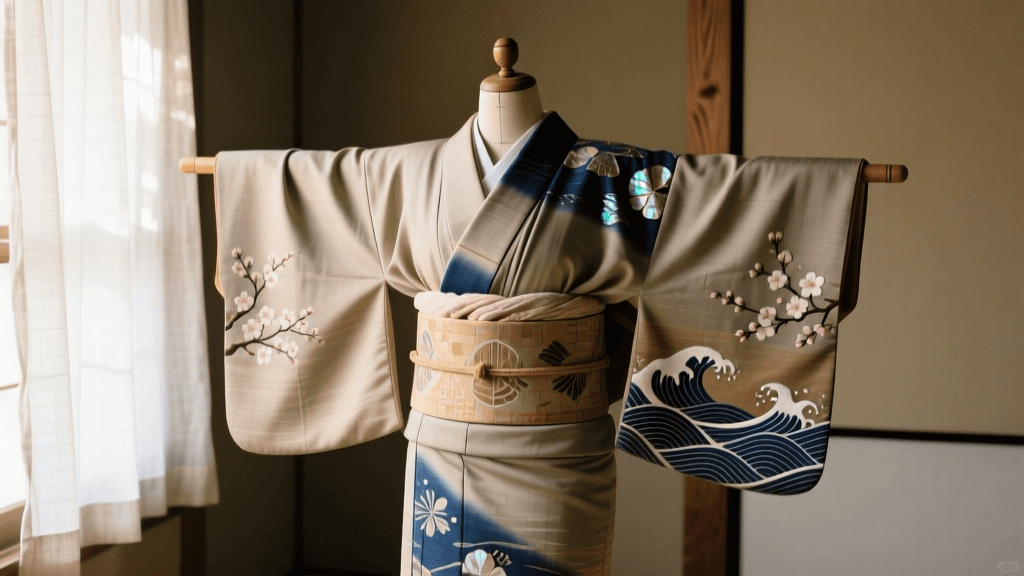
Before attempting to tie the knot, it is crucial to understand the unique construction of the Nagoya obi. Unlike a standard rectangular belt, a Nagoya obi is partially pre-folded and sewn in a specific T-shape or L-shape to reduce bulk around the waist while maintaining a wide, flat surface for the back knot.
- Dimensions: A standard Nagoya obi measures approximately 3.6 meters (11.8 feet) in length and 30 centimeters (11.8 inches) in width.
- The Te (Hand/Tail): The narrower, folded end of the obi that forms the top flap of the drum knot.
- The Do-mawari (Body Wrap): The pre-folded narrow section that wraps around the waist.
- The Tare (Drape): The wide, unfolded end that creates the main body of the Otaiko drum.
Purchasing a vintage or new silk Nagoya obi can range from $50 for a basic synthetic blend to over $500 for hand-painted Nishijin silk. For beginners, a mid-range polyester or cotton blend ($30 to $80) is highly recommended, as the added friction makes the fabric less slippery and easier to manipulate.
Essential Tools and Accessories
Tying a professional-looking Otaiko knot requires more than just the obi. You will need a specific set of undergarments and accessories to maintain the structure and tension. The Victoria and Albert Museum notes that the hidden structural elements of kimono dressing are just as vital to the garment's architectural integrity as the visible textiles.
- Koshi-himo (Tying Cords): Long, thin cotton or silk cords used to secure the obi temporarily. You will need at least two. (Cost: $10 each)
- Obi-ita (Front Board): A stiff, fabric-covered board placed between the obi layers at the front to prevent wrinkling. (Cost: $15)
- Obi-makura (Obi Pillow): A small, firm cushion used to give the Otaiko knot its signature lifted, rounded shape. (Cost: $12)
- Obi-jime (Decorative Cord): A braided silk cord tied horizontally across the center of the drum to secure the knot and add a pop of contrasting color. (Cost: $25)
- Obi-age (Silk Scarf): A piece of dyed silk peeking out from the top of the Otaiko knot, adding a subtle layer of color and hiding the obi-makura. (Cost: $30)
Comparison of Popular Obi Knots
While the Otaiko is the standard for adult women, it is helpful to understand how it compares to other common knots. Below is a structured comparison to help you choose the right knot for your occasion.
| Knot Name | Formality Level | Best Obi Type | Difficulty | Target Demographic |
|---|---|---|---|---|
| Otaiko (Drum) | Semi-Formal to Formal | Nagoya, Fukuro | Intermediate | Adult Women |
| Bunko (Library/Bow) | Informal to Semi-Formal | Hanhaba, Nagoya | Beginner | Young Women, Yukata |
| Fukura-suzume | Highly Formal | Fukuro | Advanced | Unmarried Women, Brides |
| Kai-no-kuchi | Informal | Hanhaba, Heko | Beginner | Men, Women in Yukata |
Step-by-Step Tutorial: Tying the Otaiko Knot
Ensure you are already dressed in your kimono, with the date-jime (under-obi sash) securely tied. Stand in front of a full-length mirror, and if possible, use a secondary mirror to check your back alignment.
Step 1: Preparation and Positioning the Te
Open the Nagoya obi completely. Identify the Te (the narrower, folded tail). Drape the obi over your left shoulder so that the Te hangs down your back. The edge of the Te should reach exactly to the floor, or to your ankle bone if you prefer a slightly shorter top flap. The folded edge of the Te should face upwards toward your neck. Hold the Te in place with your left hand against your left shoulder blade.
Step 2: Wrapping the Do-mawari
With your right hand, take the Do-mawari (the narrow body section) and wrap it tightly around your waist from left to right. The folded edge should sit at the top, aligning with your desired obi height (usually just below the bust line for older women, or slightly lower on the waist for younger women). Wrap it around twice. Ensure the tension is firm but allows you to breathe comfortably. Slide the Obi-ita (front board) between the first and second layers at the front center to create a smooth, flat surface.
Step 3: Securing the Waist
Take your first koshi-himo (tying cord) and wrap it around your waist over the obi layers. Tie it tightly at the front with a secure square knot, tucking the excess cord into the sides. This cord bears the entire weight of the obi, so it must be snug. Now, take the Te from your left shoulder and bring it down to meet the wide Tare end at the center of your back.
Step 4: Forming the Taiko (Drum)
This is the most complex step. Cross the Te over the Tare. The Te will form the top layer of the drum, and the Tare will form the bottom. Insert the obi-makura (pillow) inside the fold of the Tare at the back, right where the two pieces cross. Lift the pillow high on your back to create the arched drum shape. Take the wide Tare end and fold it upwards and inwards to create the bottom curve of the drum. The width of the drum should be roughly 30 to 35 centimeters, centered on your spine.
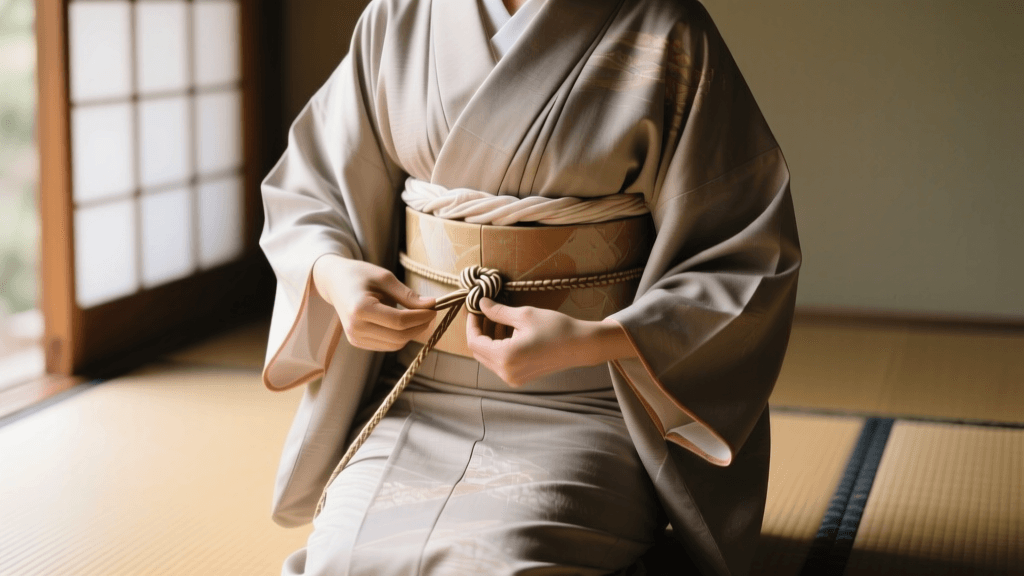
Step 5: Tying the Obi-age and Obi-jime
Wrap the obi-age (silk scarf) around the top of the obi-makura to hide the cushion and add a decorative touch. Tie it in a temporary knot at the front. Next, take the obi-jime (braided cord) and wrap it horizontally around the exact center of the Otaiko drum. Pull it incredibly tight—this cord acts as the structural lock for the entire knot. Tie it at the front using a specialized flat knot (hon-musubi), and tuck the ends neatly into the sides of the obi. Finally, adjust the obi-age at the front so that only about 1 to 2 centimeters of the silk peek out above the top edge of the obi.
Seasonal Styling and Koromogae
In Japanese tradition, the concept of Koromogae (seasonal wardrobe change) dictates not only the fabric of the kimono but also the styling of the obi. According to cultural guidelines detailed by Japan Guide, aligning your accessories with the seasons is a mark of refined taste.
- Spring (March to May): Opt for pastel-colored obi-age and obi-jime featuring cherry blossom or wisteria motifs. The Otaiko knot should be tied slightly softer to reflect the gentle breeze of spring.
- Summer (June to August): Use sheer, woven ro or sha silk for the obi. The obi-jime should be thin and light-colored, and the Otaiko knot is often tied slightly more compact to reduce the feeling of heat and bulk on the back.
- Autumn (September to November): Transition to rich, deep tones like burgundy, mustard, and forest green. Brocade Nagoya obi with maple or chrysanthemum patterns are highly favored.
- Winter (December to February): Use heavy, tightly woven silk. The obi-age can be heavily padded or made of velvet, and the Otaiko knot should be tied large, high, and firm to provide a sense of warmth and structural grandeur.
Troubleshooting Common Mistakes
Even experienced kimono dressers encounter issues when tying the Otaiko knot. Here are solutions to the most common problems:
- The Drum is Sagging: This usually means the koshi-himo was not tied tightly enough, or the obi-makura was placed too low. Untie the decorative cords, reposition the pillow higher on the back, and ensure the initial waist cord is pulled taut.
- The Front Obi is Wrinkled: You likely forgot the obi-ita (front board), or the board was inserted upside down. Always ensure the smooth, stiff side of the board faces outward.
- The Obi-jime Keeps Slipping: Silk brocade can be incredibly slippery. To prevent the cord from sliding off the drum, ensure you are pulling the cord with significant force before tying the front knot. You can also use a small piece of double-sided fabric tape discreetly placed under the cord at the back.
Conclusion
Mastering the Otaiko knot with a Nagoya obi is a rewarding endeavor that connects you directly to centuries of Japanese sartorial tradition. While the initial learning curve requires patience, precise measurements, and an understanding of structural tension, the result is a breathtaking silhouette that commands respect and admiration. By investing in the proper tools, respecting seasonal aesthetics, and practicing your tension and folds, you will soon be tying the Otaiko knot with the grace and confidence of a seasoned professional.