Master the Kimono Obi: Step-by-Step Tying Tutorials
The Art of the Obi: More Than Just a Belt
The obi is the defining element of traditional Japanese dress. Far from being a simple belt, the obi is a structural masterpiece that dictates the silhouette, formality, and aesthetic balance of the kimono or yukata. According to the Metropolitan Museum of Art, the evolution of the obi from a narrow, functional cord in the early Edo period to the wide, elaborately woven sashes seen today reflects broader shifts in Japanese textile arts and social customs. Tying an obi correctly requires an understanding of tension, proportion, and specific knotting techniques known as musubi.
Whether you are preparing for a summer festival in a lightweight cotton yukata or attending a formal tea ceremony in a silk kimono, mastering the foundational knots is essential. This guide provides actionable, step-by-step tutorials for the two most versatile and widely used obi knots: the Bunko Musubi (Bow Knot) and the Otaiko Musubi (Drum Knot).
Essential Tools for Obi Tying
Before attempting any knot, you must gather the proper under-structures and ties. Attempting to tie a formal obi without these tools will result in a sagging, asymmetrical silhouette.
- Koshi-himo (Waist Cords): Long, narrow cotton or silk cords used to secure the kimono and hold the obi in place during the tying process. You will need at least two.
- Obi-ita (Obi Board): A stiff, felt-covered board inserted between the obi layers at the front to prevent wrinkling and maintain a smooth, flat appearance.
- Obi-makura (Obi Pillow): A small, padded cushion used to give volume and structure to complex knots like the Otaiko Musubi.
- Obi-age (Obi Scarf): A piece of dyed silk cloth wrapped around the obi-makura to conceal it and add a pop of color at the top edge of the knot.
- Obi-jime (Obi Cord): A decorative, braided cord tied horizontally across the center of the obi to secure the knot and provide a finishing accent.
Understanding Obi Types and Formality
Selecting the correct knot depends entirely on the type of obi you are wearing. The Victoria and Albert Museum notes that the hierarchy of Japanese dress is strictly codified, and mismatching an obi type with the wrong knot or kimono formality is a common faux pas. Below is a comparison chart to help you identify your obi and select the appropriate tutorial.
| Obi Type | Width / Length | Formality Level | Best Knots | Ideal Garment |
|---|---|---|---|---|
| Hanhaba Obi | 15 cm / 300 cm | Casual | Bunko (Bow), Rikyu | Yukata, Casual Wool Kimono |
| Nagoya Obi | 30 cm (tapered) / 315 cm | Semi-Formal to Formal | Otaiko (Drum) | Edo Komon, Tsumugi, Iromuji |
| Fukuro Obi | 30 cm / 420+ cm | Highly Formal | Niju-daiko, Fuku-suzumi | Furisode, Tomesode, Houmongi |
Tutorial 1: The Bunko Musubi (Bow Knot)
The Bunko Musubi resembles a butterfly or a simple bow. It is the standard knot for the Hanhaba Obi and is predominantly worn with yukata during summer festivals. This knot is tied at the back but can be rotated to the front for easier adjustment before being spun back into place.
Step-by-Step Instructions
Timing: 5–7 minutes for beginners.
Measurements: Leave a 40 cm tail at the front before wrapping.
- Find the Center: Fold the hanhaba obi in half to find the center point. Place this center point at your front right hip.
- First Wrap: Wrap the longer end of the obi around your back to the left, pulling it tightly to the front. Secure it temporarily by crossing it over the shorter end.
- Second Wrap: Wrap the long end around your waist a second time, ensuring the bottom edge aligns perfectly with the first wrap. Pull taut.
- Create the Bow Loops: Take the remaining long end and fold it into accordion-style pleats, each about 15 cm wide. This will form the loops of your bow.
- Secure the Center: Take the shorter end (the 40 cm tail left at the front), pull it tightly over the center of the pleated loops, and tie a firm square knot underneath the bow.
- Rotate and Adjust: If you tied this at your front for visibility, grasp the entire obi firmly and rotate it clockwise to the center of your back. Fluff the loops to resemble a butterfly.
Tutorial 2: The Otaiko Musubi (Drum Knot)
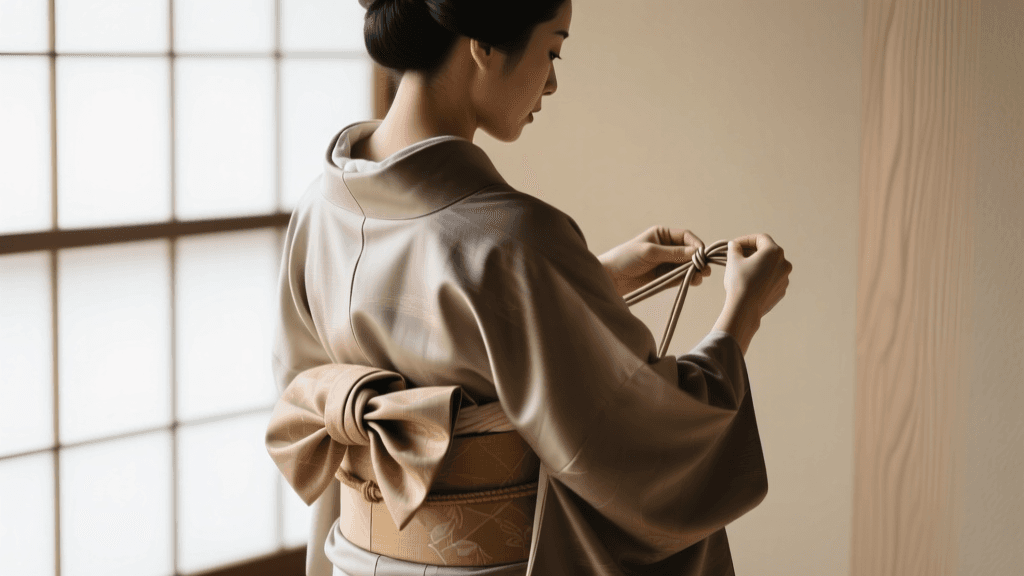
The Otaiko Musubi is the quintessential knot for married women and older adults, characterized by a smooth, drum-like fold at the back. It is designed for the Nagoya Obi, which is pre-folded and stitched at one end to make this complex-looking knot achievable.
Step-by-Step Instructions
Timing: 10–15 minutes.
Measurements: The narrower, stitched end (the te) should hang down about 30 cm from the top edge of the obi at your back.
- Position the Obi: Drape the Nagoya obi over your shoulders with the wide part at the back and the narrow, stitched part at the front. The folded edge should face upwards.
- Wrap the Wide Section: Take the wide, open end and wrap it tightly around your waist twice from right to left. Secure it temporarily with a koshi-himo cord tied firmly at the front.
- Form the Drum (Otaiko): At the back, pull the wide end up and over the koshi-himo to create a large, flat loop. This is the 'drum'. Insert your obi-makura (pillow) into the top fold of this loop to give it volume.
- Apply the Obi-age: Wrap your obi-age silk scarf over the obi-makura, tying it loosely at the front to hide the pillow. Tuck the excess fabric into the top of the obi.
- Secure the Tail (Te): Take the narrow, stitched end that has been hanging down. Pull it up through the center of the drum loop from the bottom.
- Tie the Obi-jime: Wrap the decorative obi-jime cord around the exact center of the drum, pulling it tight at the back and tying it with a secure flat knot at the front. Tuck the narrow tail of the obi neatly under the obi-jime at the back.
- Final Adjustments: Insert the obi-ita board at the front between the obi layers to smooth out any wrinkles. Adjust the tension so the obi feels like a firm, supportive corset.
Troubleshooting Common Obi Tying Mistakes
Even with meticulous preparation, beginners often encounter structural issues. Here is how to fix the most common problems:
- The Obi Slips Downward: This occurs when the initial koshi-himo is not tied tightly enough, or if the kimono fabric is too slippery. Solution: Use a textured cotton koshi-himo rather than silk, and tie it directly over the hip bones, not the soft part of the waist.
- The Drum Knot Sags: A sagging Otaiko means the obi-makura is too small or the obi-jime is not pulled taut. Solution: Upgrade to a firmer, larger obi-makura and ensure the obi-jime is locked tightly across the center of gravity.
- Wrinkles at the Front: Solution: Always use an obi-ita board. If you do not have one, a piece of thick, stiff cardboard wrapped in a cotton handkerchief serves as an excellent emergency substitute.
'The obi is the soul of the kimono. While the fabric of the garment may dictate the season and the occasion, the knot of the obi reveals the wearer's age, marital status, and personal refinement.' — Traditional Japanese Dressing Proverb.
Cultural Etiquette and Sourcing Authentic Obi
When participating in Japanese cultural activities, such as tea ceremonies or visiting Shinto shrines, understanding the Japan National Tourism Organization's guidelines on traditional dress is highly recommended. For formal events, avoid overly flashy bow knots (like the Bunko) if you are over the age of 30; opt for the subdued elegance of the Otaiko Musubi instead.
If you are looking to purchase your first authentic obi, seek out vintage silk Nagoya obi from specialized online kimono recyclers or reputable dealers in Kyoto's Nishijin district. Vintage pieces offer high-quality brocade weaves at a fraction of the cost of new, custom-woven Fukuro obi, allowing beginners to practice their tying techniques on beautiful, historically significant textiles without the fear of ruining a costly investment.
Mastering the obi takes patience and muscle memory. Practice tying your chosen knot on a dress form or a willing friend before attempting it on yourself for a time-sensitive event. With consistent practice, the intricate folds and precise tensions of the musubi will become second nature, allowing you to wear traditional Japanese garments with confidence and grace.