Ancient Greek Chiton Construction Guide: 2026 Reenactment Patterns

The Resurgence of Classical Antiquity in 2026
The revival of classical Mediterranean garments has reached unprecedented heights in the 2026 historical reenactment and living history season. As modern enthusiasts and theatrical costumers demand higher levels of authenticity, the chiton—the foundational body garment of ancient Greece and later adapted by Roman cultures—has become a focal point of study and reconstruction. Unlike the tailored, fitted garments of later medieval European folk dress, the chiton relies entirely on the geometric manipulation of rectangular textiles, secured by pins and gravity. This comprehensive guide will walk you through the historical nuances, textile sourcing, and step-by-step construction of both the Doric and Ionic chiton for the modern practitioner.
Understanding the Chiton: Doric vs. Ionic
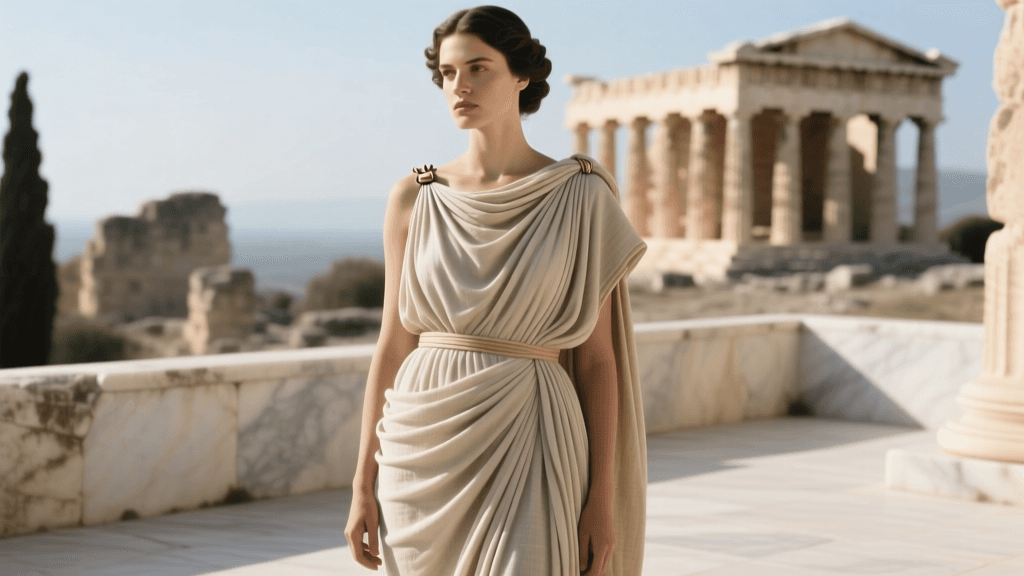
Before cutting any fabric, it is vital to understand the two primary variations of the Greek chiton. According to the Metropolitan Museum of Art's Heilbrunn Timeline of Art History, the evolution of Greek dress was deeply tied to trade, climate, and cultural exchange. The Doric chiton (often conflated with the peplos) and the Ionic chiton represent two distinct approaches to draping and textile weight.
| Feature | Doric Chiton (Peplos) | Ionic Chiton |
|---|---|---|
| Primary Material | Heavyweight Wool Flannel or Tweed | Lightweight Linen or Fine Cotton |
| Construction | Single rectangular wrap, pinned at shoulders | Sewn side seam, pinned along the arms to form sleeves |
| Overfold (Apoptygma) | Prominent, deep fold over the chest and back | Optional, usually shorter or omitted entirely |
| Climate Suitability | Winter, mountainous regions, northern Greece | Summer, coastal regions, Ionia, southern Italy |
| Fasteners | Large, heavy brooches or fibulae | Multiple small pins (fibulae) or sewn ties |
Sourcing Authentic Textiles for the 2026 Season
In 2026, the historical textile market has seen a massive shift toward sustainably sourced, historically accurate fibers. For an authentic Ionic chiton, you must avoid modern, stiff utility linens. Instead, seek out handkerchief-weight linen (approximately 3.5 to 4.5 oz per square yard) or semi-sheer ramie. These fabrics possess the necessary fluid drape to create the cascading folds seen in classical Hellenistic sculpture.
For the Doric variant, lightweight wool crepe or heavily fulled wool flannel is ideal. The fabric must have enough structural integrity to hold the heavy apoptygma (overfold) without sagging, yet remain pliable enough to gather at the waist. Natural dyeing has also become a standard for top-tier reenactors; utilizing weld for yellow, madder root for terracotta, and woad for pale blues will elevate your garment far beyond the bleached-white costumes of early 20th-century theatrical productions.
Step-by-Step Drafting: The Ionic Chiton
The Ionic chiton is essentially a wide cylinder of fabric that is gathered and pinned along the upper edge to create a fitted bodice and flowing sleeves. Here is how to draft and construct one using modern measurements while maintaining historical integrity.
1. Taking Measurements and Cutting
- Width: Measure your wingspan (fingertip to fingertip with arms outstretched). Add 10 to 15 inches for ease and drape volume. For an average adult, this results in a fabric width of roughly 75 to 85 inches.
- Length: Measure from the prominent vertebra at the base of your neck down to the floor, then add 12 to 18 inches. This extra length is crucial for creating the kolpos (the bloused overhang that rests over the belt).
2. Sewing the Side Seam
Fold the fabric in half widthwise so the selvedges meet. Sew a French seam along the vertical edge to enclose the raw edges, leaving the top 10 inches open if you prefer a side-slit for walking ease. Hem the top and bottom edges with a narrow, hand-rolled hem for maximum historical accuracy.
3. Pinning the Shoulders and Sleeves
This is where the magic of the Ionic chiton occurs. Put the tube on, pulling the side seam to one side of your body. Gather the top edge evenly across your front and back. Using a series of small, historically styled fibulae (or modern safety pins disguised with wax seals or beads), pin the front and back edges together at intervals along your arms.
Pro-Tip for 2026 Reenactors: Space your pins approximately 3 to 4 inches apart along the arm. The gap between the pins creates the "slashed sleeve" effect, allowing the linen to billow out elegantly between the fasteners.
The Art of Draping: Kolpos and Zoning
Once the chiton is pinned at the shoulders, it will hang straight to the floor, likely tripping you. The next step is zoning, or belting. Wrap a long, woven wool or linen cord (the zone) tightly around your natural waist or high under the bust, depending on the specific regional era you are portraying.
Reach inside the garment from the bottom hem and pull the fabric up and over the belt until the hemline falls just below your ankles or calves. This creates the kolpos, a bloused fold that hides the belt entirely and provides a beautiful, layered volume around the hips and torso. Adjust the pulls evenly around your body to ensure the hem is level.
Accessories: The Himation and Footwear
No chiton was worn in public without secondary layers and accessories. The World History Encyclopedia notes that the himation (a large rectangular cloak) was an essential marker of citizenship and modesty. Draping the himation requires a separate study, but the basic method involves throwing the heavy wool rectangle over the left shoulder, wrapping it across the back, under the right arm, and tossing the remaining fabric back over the left shoulder or arm.
For footwear, abandon modern leather sandals with thick rubber soles. The 2026 standard for classical reenactment demands hand-stitched, vegetable-tanned leather krepides (strappy sandals) that lace up the calf, or simple leather turn-shoes for indoor and theatrical settings.
Common Reenactment Mistakes to Avoid
- Using Patterned Fabrics: While ancient Greeks loved color, they rarely used woven plaids or complex printed patterns for the chiton. Stick to solid, naturally dyed colors or simple woven border stripes (clavi in later Roman adaptations).
- Over-tailoring: Never cut armholes or sew a fitted bodice. The beauty of the chiton lies in its geometric simplicity and reliance on the body's form to create the silhouette.
- Ignoring the Undergarments: For modesty and comfort, particularly with lightweight linen, wear a simple linen perizoma (loincloth) or a modern flesh-toned slip beneath the chiton.
Conclusion
Constructing an authentic Doric or Ionic chiton is a masterclass in the relationship between textile, gravity, and the human form. By sourcing the correct weights of linen and wool, mastering the art of the fibulae placement, and perfecting your kolpos draping, you will achieve a classical silhouette that honors the ingenuity of ancient Mediterranean cultures. Whether you are preparing for a university symposium, a living history museum, or the 2026 Hellenic festival circuit, this foundational garment will serve as the perfect canvas for your historical wardrobe.