DIY Mamianqun Sewing Guide: Patterns, Pleats, and Fabrics
The Resurgence of the Mamianqun in Modern Hanfu
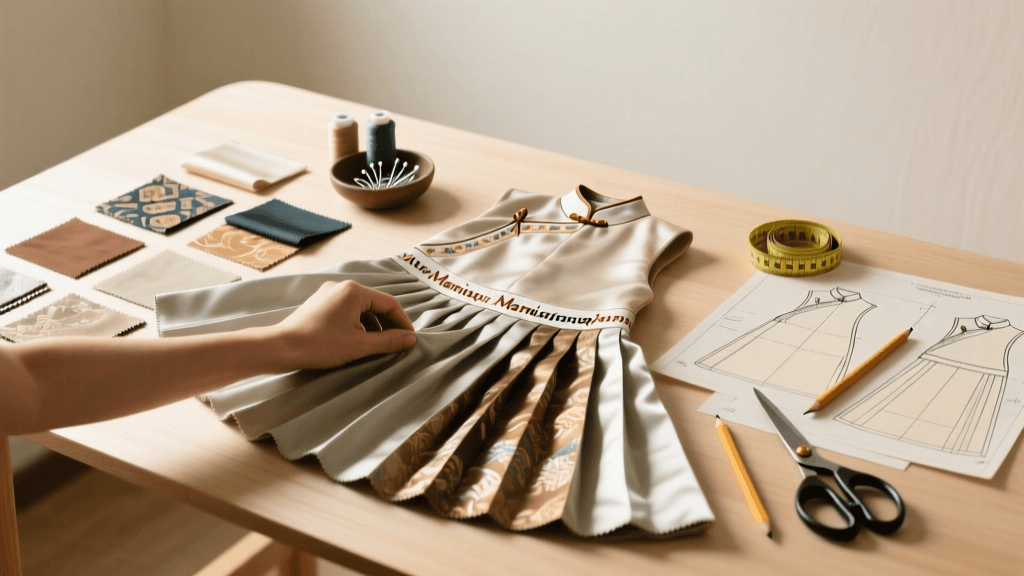
The Mamianqun, widely known in English as the 'horse-face skirt,' is arguably the most iconic and recognizable garment in the traditional Chinese Hanfu wardrobe. Characterized by its flat, unpleated front and back panels (the 'horse faces') and intricately pleated sides, this wrap skirt has seen a massive revival among DIY sewists and Hanfu enthusiasts worldwide. Its elegant silhouette, which flares beautifully during movement while maintaining a structured waist, makes it a staple for both daily wear and formal occasions.
The structural origins of the Mamianqun trace back to the Ming Dynasty (1368–1644), a period renowned for its intricate textile weaving, elaborate embroidery, and distinct sartorial codes. As noted by The Metropolitan Museum of Art, Ming dynasty textiles and garments were characterized by their luxurious materials and highly structured silhouettes, which heavily influenced the architectural volume of the Mamianqun. When studying extant Ming and Qing dynasty garments preserved in institutions like the Victoria and Albert Museum, one can observe the meticulous pleating, heavy silk brocades, and ornate woven borders that gave the skirt its enduring elegance. Today, modern makers are translating these historical techniques into accessible DIY sewing projects.
Choosing the Right Fabric for Hanfu Skirts
Selecting the correct fabric is the most critical decision you will make when sewing a Mamianqun. The skirt requires a material that possesses enough 'body' to hold sharp, permanent pleats, yet enough drape to flow gracefully when you walk. Flimsy fabrics will result in collapsed pleats, while overly stiff fabrics will create a bulky, unflattering waistline.
| Fabric Type | Weight | Drape | Pleat Retention | Best For |
|---|---|---|---|---|
| Silk Brocade / Jacquard | Heavy | Moderate | Excellent | Winter wear, formal events, historical accuracy |
| Polyester Jacquard | Medium-Heavy | Moderate | Excellent | Everyday wear, budget-friendly historical cosplay |
| Cotton-Linen Blend | Medium | High | Good (requires heavy starch) | Summer wear, casual daily Hanfu |
| Chiffon / Organza | Light | Very High | Poor (requires synthetic heat-setting) | Fairy-style Hanfu, layering, warm weather |
For beginners, a mid-weight polyester jacquard or a cotton-polyester blend is highly recommended. These fabrics are forgiving on a standard home sewing machine, respond exceptionally well to heat-pressed pleats, and are cost-effective for the large yardage required.
The Mathematics of Pleating: Calculating Your Pattern
Unlike Western gathered skirts, the Mamianqun relies on precise mathematical calculations to ensure the flat panels overlap correctly and the pleats sit flush against the body. A traditional Mamianqun is constructed from two identical, large rectangular panels that wrap around the body and tie at the waist.
To calculate the width of each rectangular panel, you must account for three distinct sections: the flat 'horse face' panel, the pleated side section, and the inner overlap panel. A standard formula for one panel width is:
- Flat Panel Width: Typically 1/4 of your waist circumference plus 2 inches for ease.
- Pleated Section Width: Determine your desired pleat depth (e.g., 1.5 inches per pleat) and multiply by the number of pleats (usually 6 to 8 pleats per side).
- Inner Overlap Width: Equal to the Flat Panel Width to ensure full coverage when wrapped.
Therefore, if your waist is 28 inches, your flat panel is roughly 9 inches. If you want six 1.5-inch pleats, your pleated section is 9 inches. Your inner overlap is another 9 inches. The total width of one fabric panel before pleating would be 27 inches. Since you need two identical panels, you will be cutting and pleating a massive amount of fabric, which is why accurate math is essential before you make your first cut.
Step-by-Step Construction Guide
1. Cutting the Panels and Hemming
Cut two large rectangles based on your mathematical calculations, adding 1 inch to the top for the waistband seam allowance and 2 inches to the bottom for the hem. Because the Mamianqun is heavily pleated, it is vital to finish the bottom hem before you pleat the fabric. Use a narrow rolled hem or a blind hem stitch to keep the bottom edge clean and lightweight. If you are using a patterned fabric or brocade, ensure the motif is perfectly aligned across both panels.
2. Attaching the 'Lan' (Decorative Borders)
Historically, the hem and sometimes the knee-level of a Mamianqun featured 'lan'—woven or embroidered decorative borders. For a DIY approach, you can source pre-embroidered ribbon, jacquard trim, or contrasting silk fabric strips. Pin the trim parallel to the hemline, typically 2 to 4 inches above the bottom edge. Sew using a straight stitch, ensuring the trim lies perfectly flat. If your fabric is prone to fraying, apply a lightweight fusible interfacing to the wrong side of the fabric behind the trim to provide stability and prevent puckering.
3. Pleating and Heat-Setting
This is the most labor-intensive step. Mark your pleat lines on the wrong side of the fabric using a fabric pen or tailor's chalk. Fold the fabric along the lines, securing each pleat with binder clips or silk pins. Traditional Hanfu makers use a 'pleater board' to ensure uniform depth. Once folded, you must heat-set the pleats. Using a steam iron on the appropriate setting for your fabric, press each pleat firmly. For natural fibers like cotton or silk, a mixture of water and white vinegar sprayed lightly before pressing will help 'lock' the pleats in place permanently. Allow the fabric to cool completely before moving it.
4. Constructing the Waistband (Yaolan)
The waistband, or 'yaolan,' is traditionally made from a contrasting fabric, often white or light-colored cotton or linen, as it is meant to be hidden beneath a top or jacket. Cut a long strip of fabric (roughly 4 inches wide and long enough to wrap around your waist and tie in a bow or knot). Fold it in half lengthwise and press. Sandwich the top raw edge of your pleated skirt panels inside the folded waistband. Topstitch securely, ensuring you catch all layers of the thick pleats. Attach long fabric ties to each end of the waistband to allow for the traditional wrap-and-tie closure.
Common Beginner Mistakes to Avoid
- Ignoring the Overlap: Failing to account for the inner overlap panel will result in a skirt that gaps open at the side when you walk, exposing your legs.
- Skipping the Interfacing: The waistband takes the brunt of the skirt's weight. Without medium-weight fusible interfacing inside the yaolan, the waistband will buckle and roll over throughout the day.
- Pleating Over the Trim: If your 'lan' border is too thick or stiff, pleating over it can create severe bulk. Many historical skirts only applied trim to the flat 'horse face' panels, leaving the pleated sections unadorned to maintain a crisp fold.
Essential Tools for the DIY Hanfu Maker
To achieve professional, couture-level results at home, invest in the following tools:
- Pleater Board or Clapper: A wooden sewing clapper is essential for trapping steam and forcing thick fabrics into sharp, permanent creases.
- Heavy-Duty Steam Iron: A standard travel iron will not generate enough continuous steam to set 16 layers of brocade.
- Binder Clips: Forget standard sewing pins; heavy-duty binder clips are the secret weapon for holding thick, multi-layered Hanfu pleats in place before pressing.
- Walking Foot Attachment: When sewing the waistband through multiple layers of pleated fabric, a walking foot for your sewing machine will prevent the top and bottom layers from shifting.
Conclusion
Sewing your own Mamianqun is a deeply rewarding journey into the mechanics of traditional Asian garment construction. By understanding the historical context, selecting the appropriate textiles, and mastering the mathematics of the pleats, you can create a stunning, historically inspired piece that bridges the gap between Ming dynasty elegance and modern DIY craftsmanship.